0 简介 Prometheus是最初在SoundCloud上构建的开源系统监视和警报工具包 。自2012年成立以来,许多公司和组织都采用了Prometheus,该项目拥有非常活跃的开发人员和用户社区。现在,它是一个独立的开源项目,并且独立于任何公司进行维护。为了强调这一点并阐明项目的治理结构,Prometheus 在2016年加入了 Cloud Native Computing Foundation,这是继Kubernetes之后的第二个托管项目。
强大的多维度数据模型。 时间序列数据通过 metric 名和键值对来区分。 所有的 metrics 都可以设置任意的多维标签。 数据模型更随意,不需要刻意设置为以点分隔的字符串。 可以对数据模型进行聚合,切割和切片操作。 支持双精度浮点类型,标签可以设为全 unicode。 灵活而强大的查询语句(PromQL):在同一个查询语句,可以对多个 metrics 进行乘法、加法、连接、取分数位等操作。 易于管理: Prometheus server 是一个单独的二进制文件,可直接在本地工作,不依赖于分布式存储。 高效:平均每个采样点仅占 3.5 bytes,且一个 Prometheus server 可以处理数百万的 metrics。 使用 pull 模式采集时间序列数据,这样不仅有利于本机测试而且可以避免有问题的服务器推送坏的 metrics。 可以采用 push gateway 的方式把时间序列数据推送至 Prometheus server 端。 可以通过服务发现或者静态配置去获取监控的 targets。 有多种可视化图形界面。 易于伸缩。 1 基础环境 2 安装Prometheus 2.1 安装 1 2 tar zxf prometheus-2.25.0.linux-amd64.tar.gz -C /optmv /opt/prometheus-2.25.0.linux-amd64 /opt/prometheus
2.2 配置开机自启动 1 2 3 4 5 6 7 8 9 10 11 12 13 14 15 16 vim /usr/lib/systemd/system/prometheus.serviceenable prometheus
2.3 启动服务 1 2 systemctl start prometheus
2.4 验证 浏览器打开IP:9090端口即可打开 prometheus 自带的监控页面:
3 安装Grafana 普罗米修斯默认的页面可能没有那么直观,我们可以安装grafana使监控看起来更直观。
3.1 配置清华大学的yum源 打开浏览器输入地址:https://mirror.tuna.tsinghua.edu.cn/help/grafana/,复制CentOS/Redhat用户部分:
1 2 3 4 5 6 7 8 vim /etc/yum.repos.d/grafana.repo
3.2 安装Grafana 3.3 启动服务 1 2 3 systemctl daemon-reloadenable grafana-server
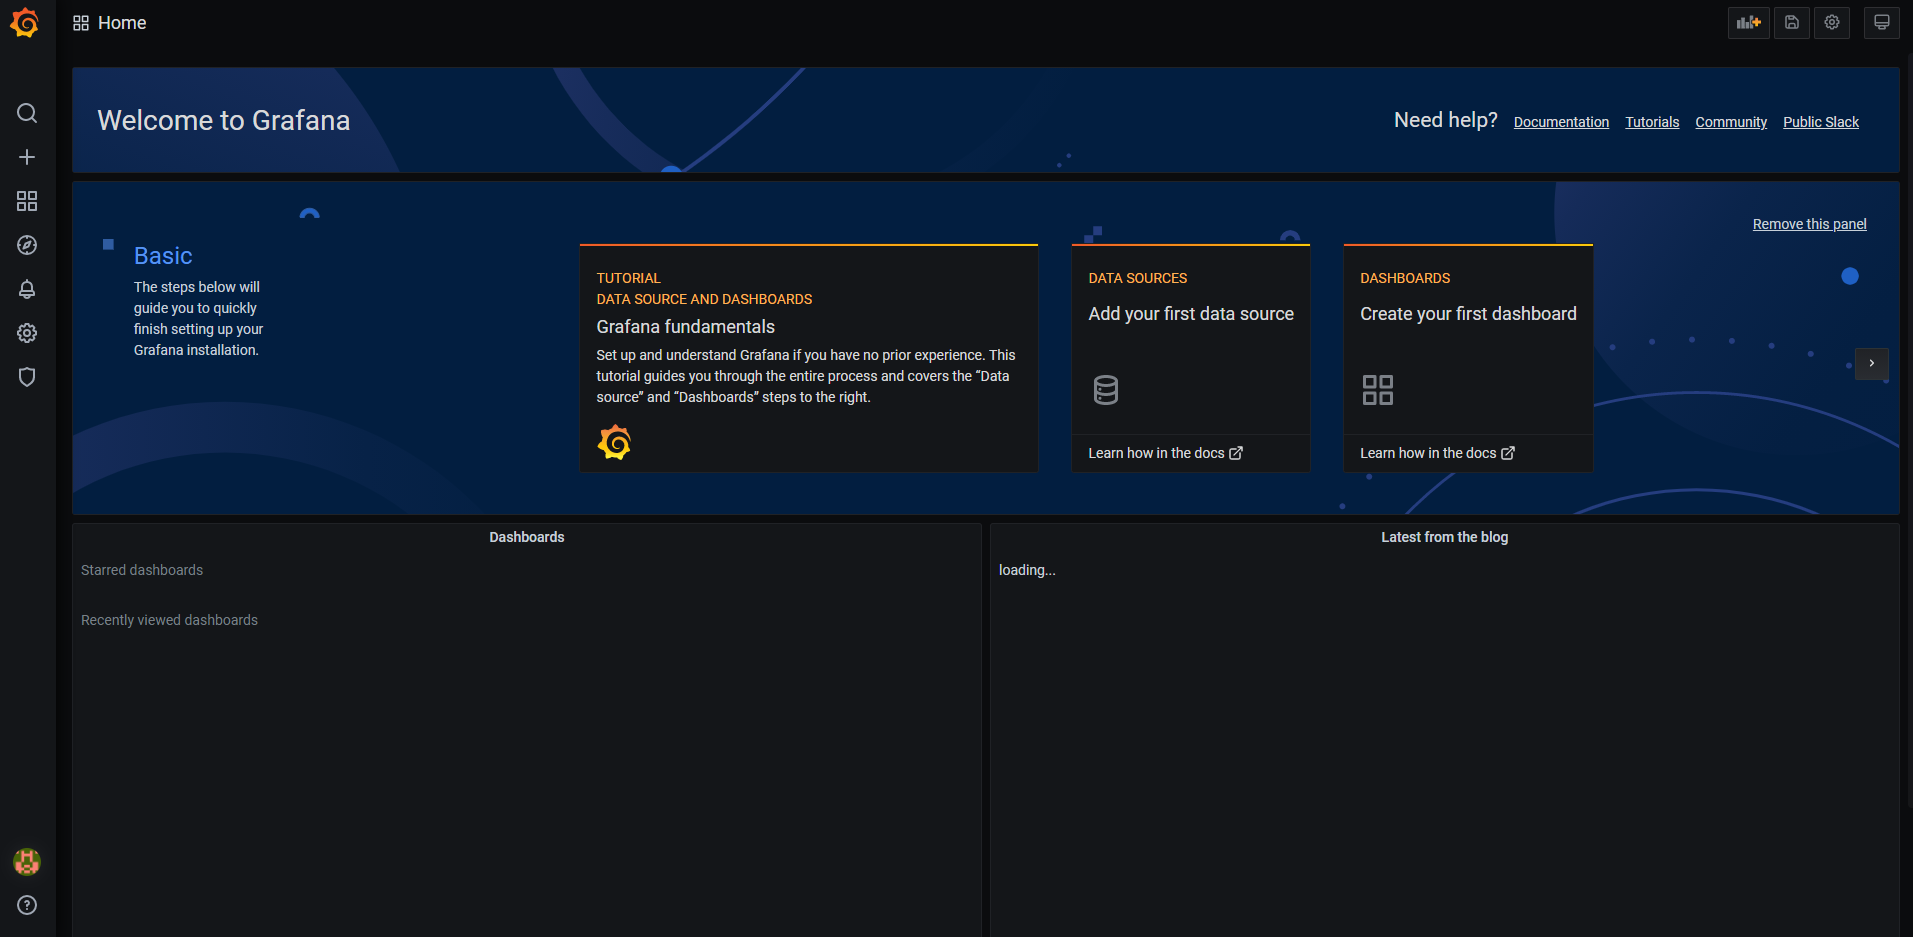
3.4 访问Grafana 浏览器访问IP:3000端口,即可打开grafana页面,默认用户名密码都是admin,初次登录会要求修改默认的登录密码:
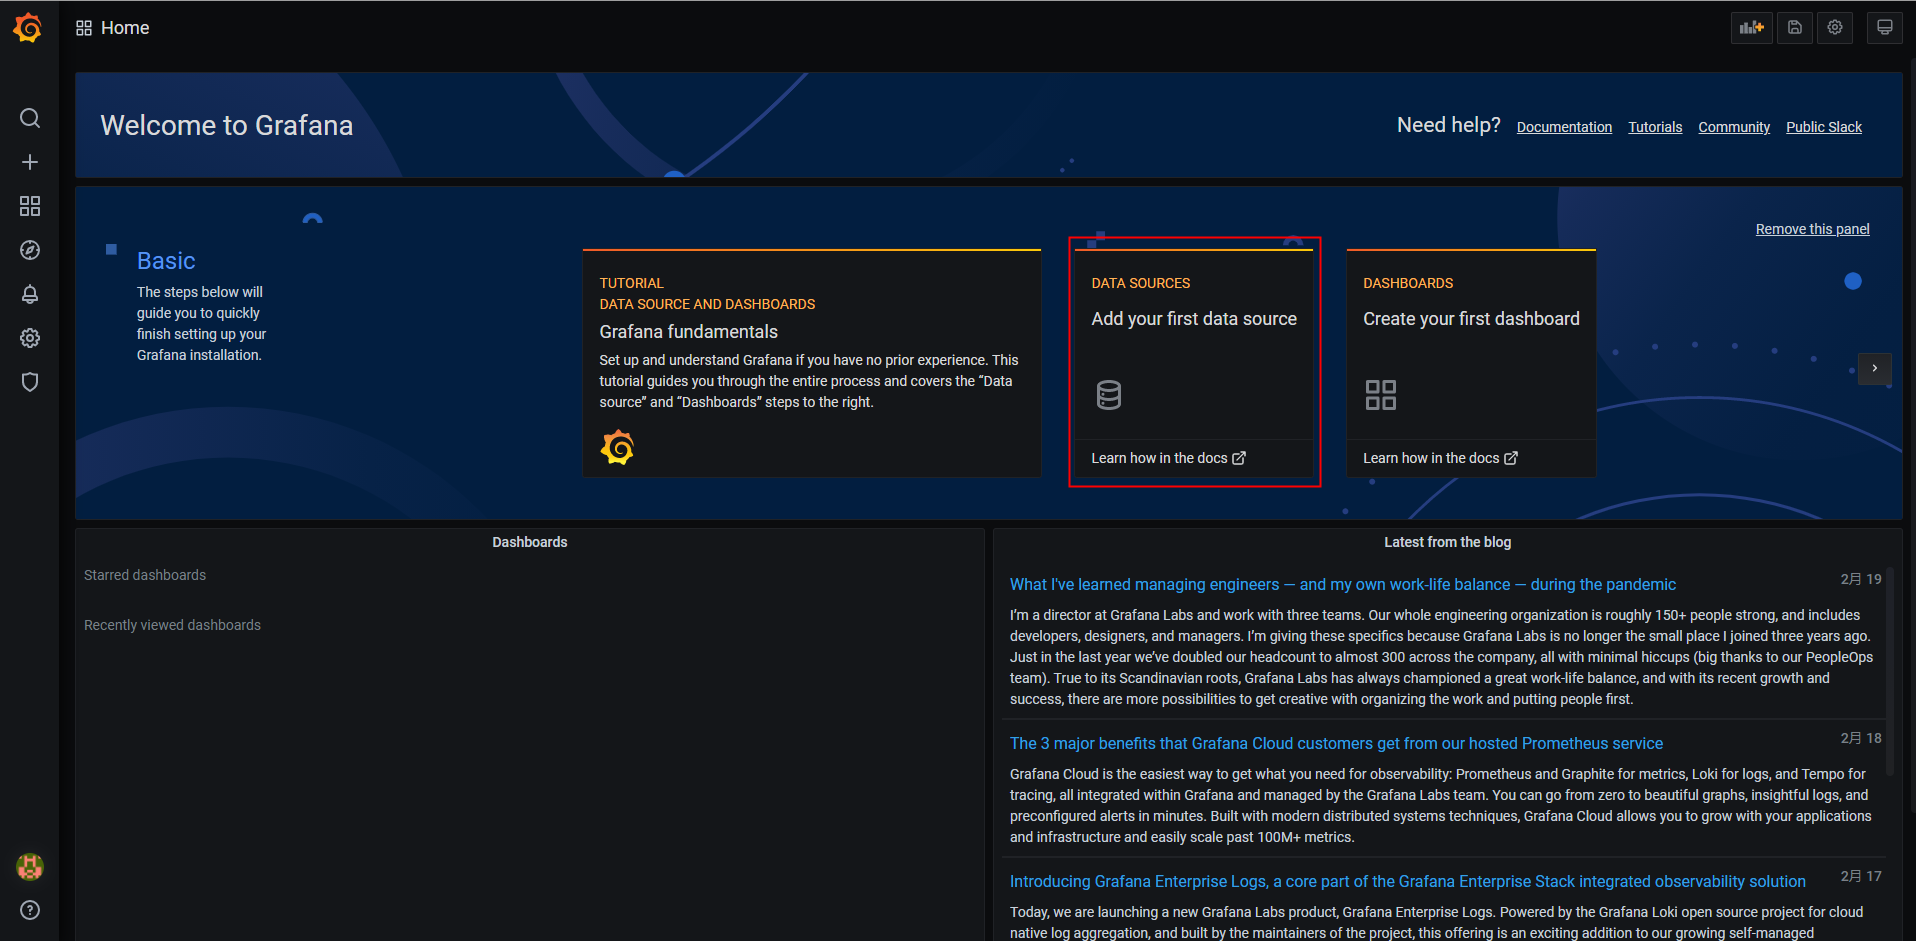
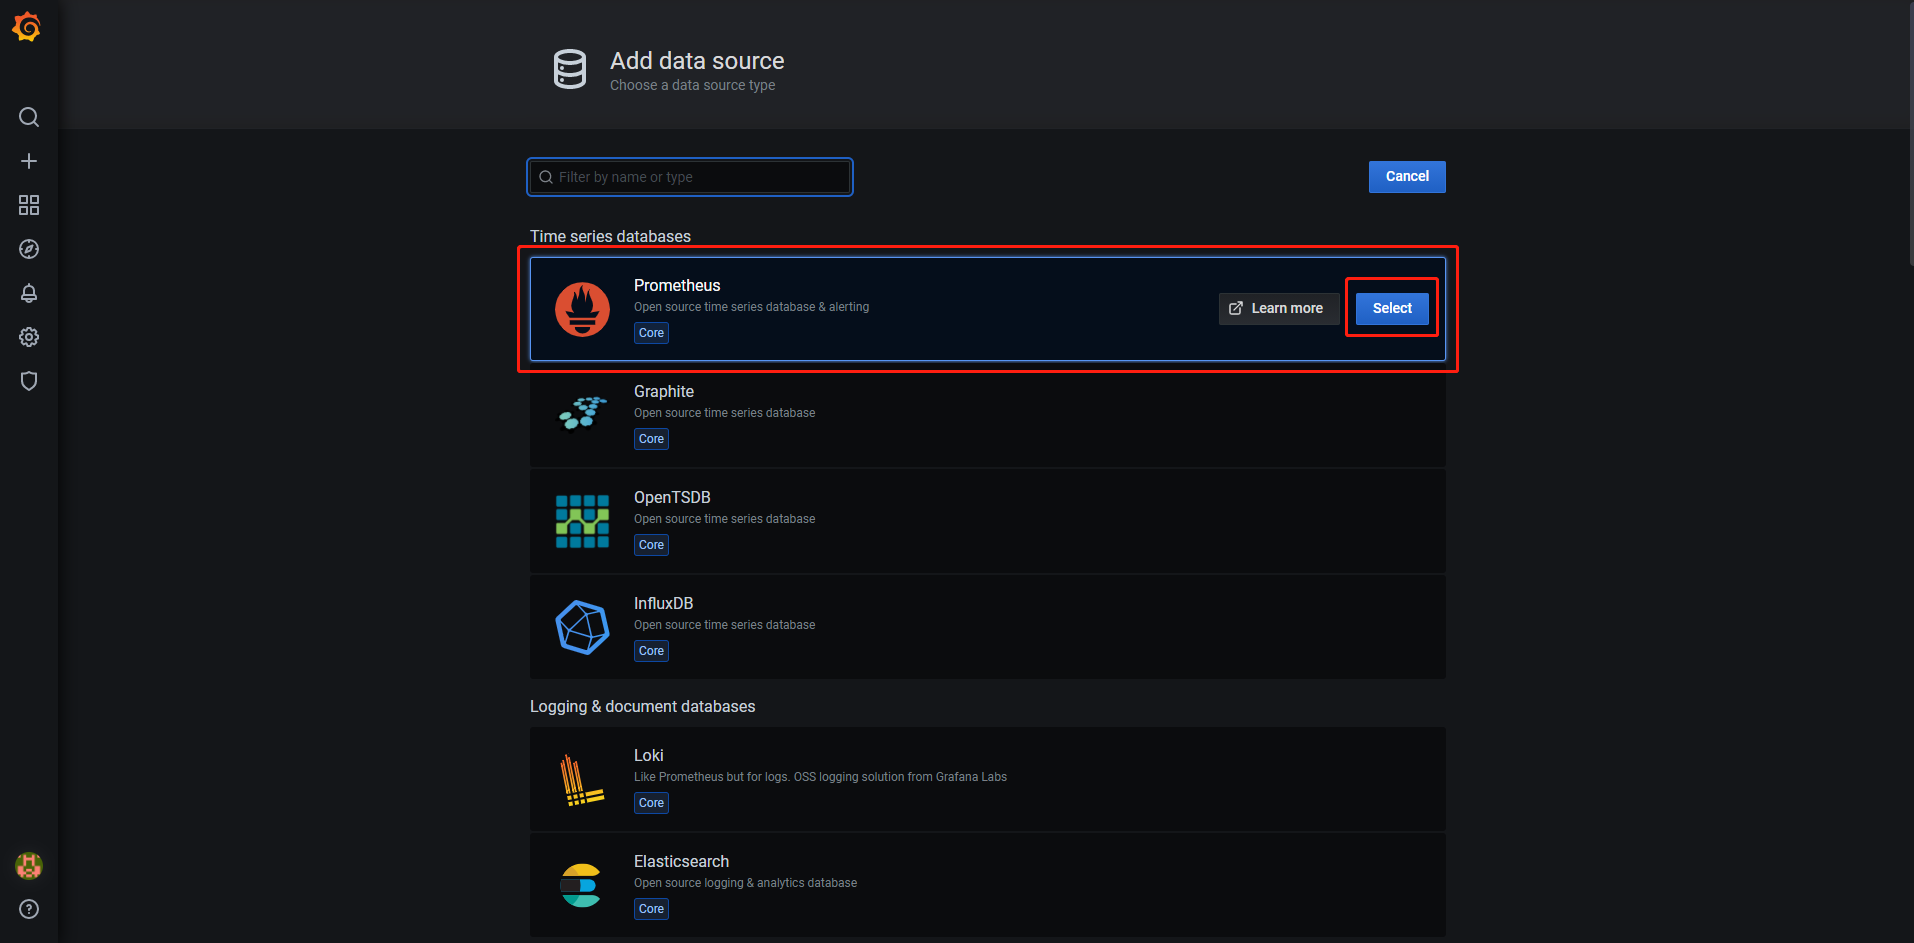
3.5 添加Prometheus数据源 点击主界面的“Add your first data source”并选择Prometheus:
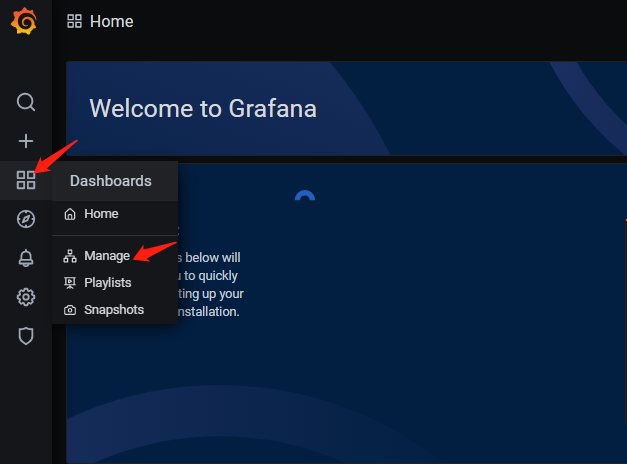
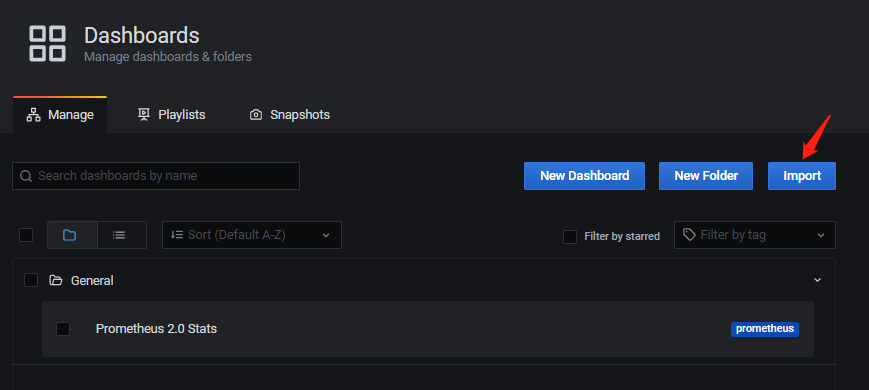
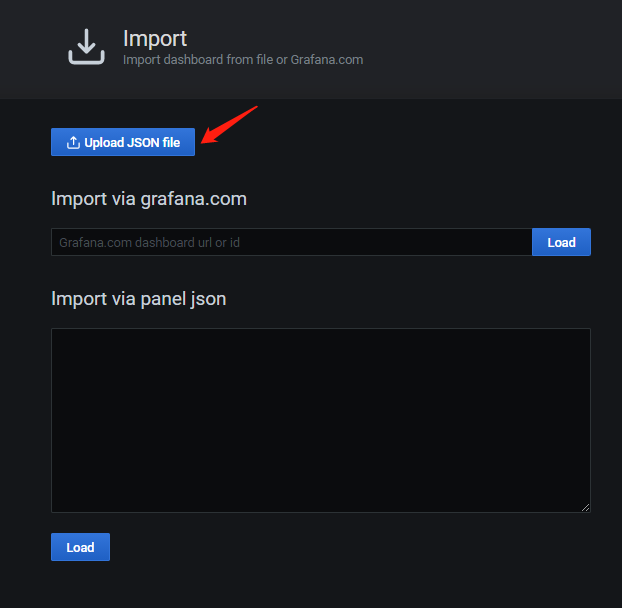
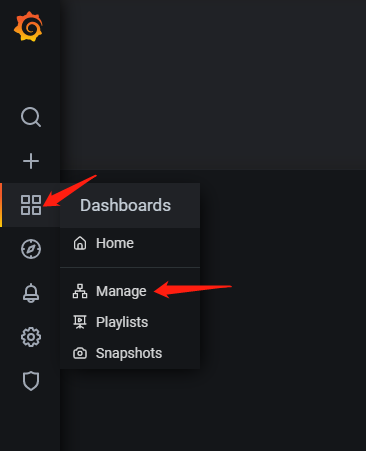
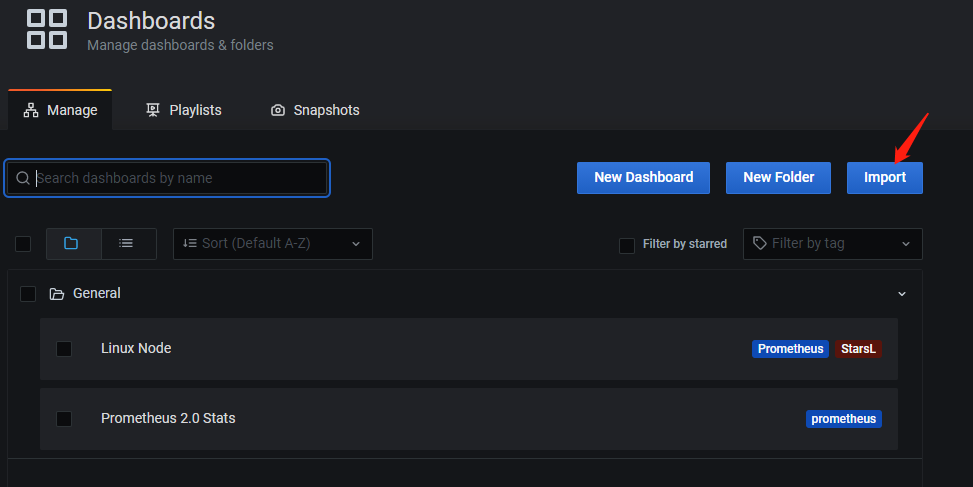
Dashboards页面选择“Prometheus 2.0 Stats”进行Import:
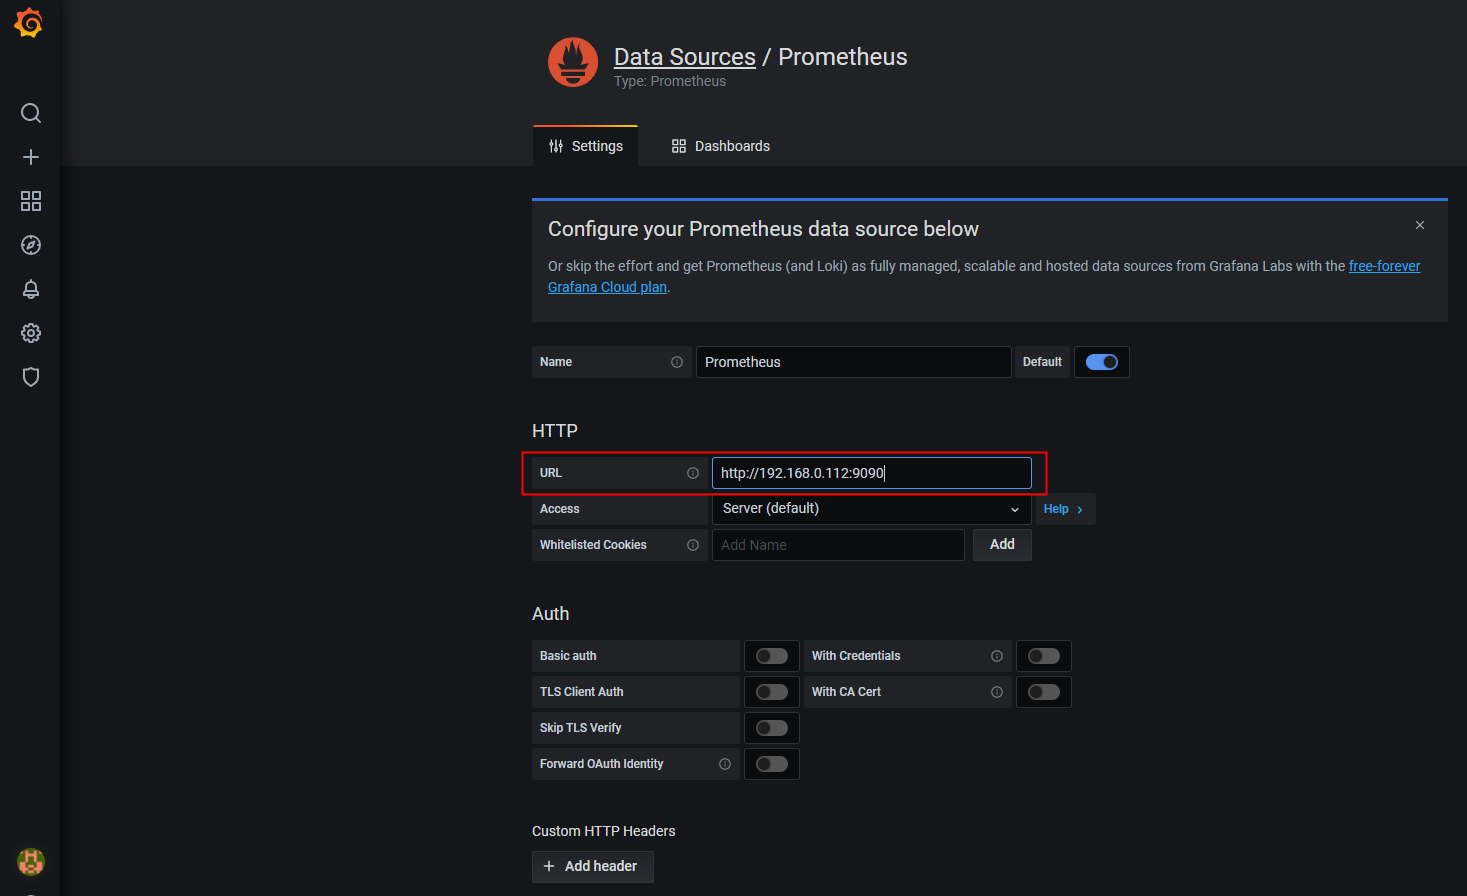
Settings页面填写普罗米修斯地址并保存:
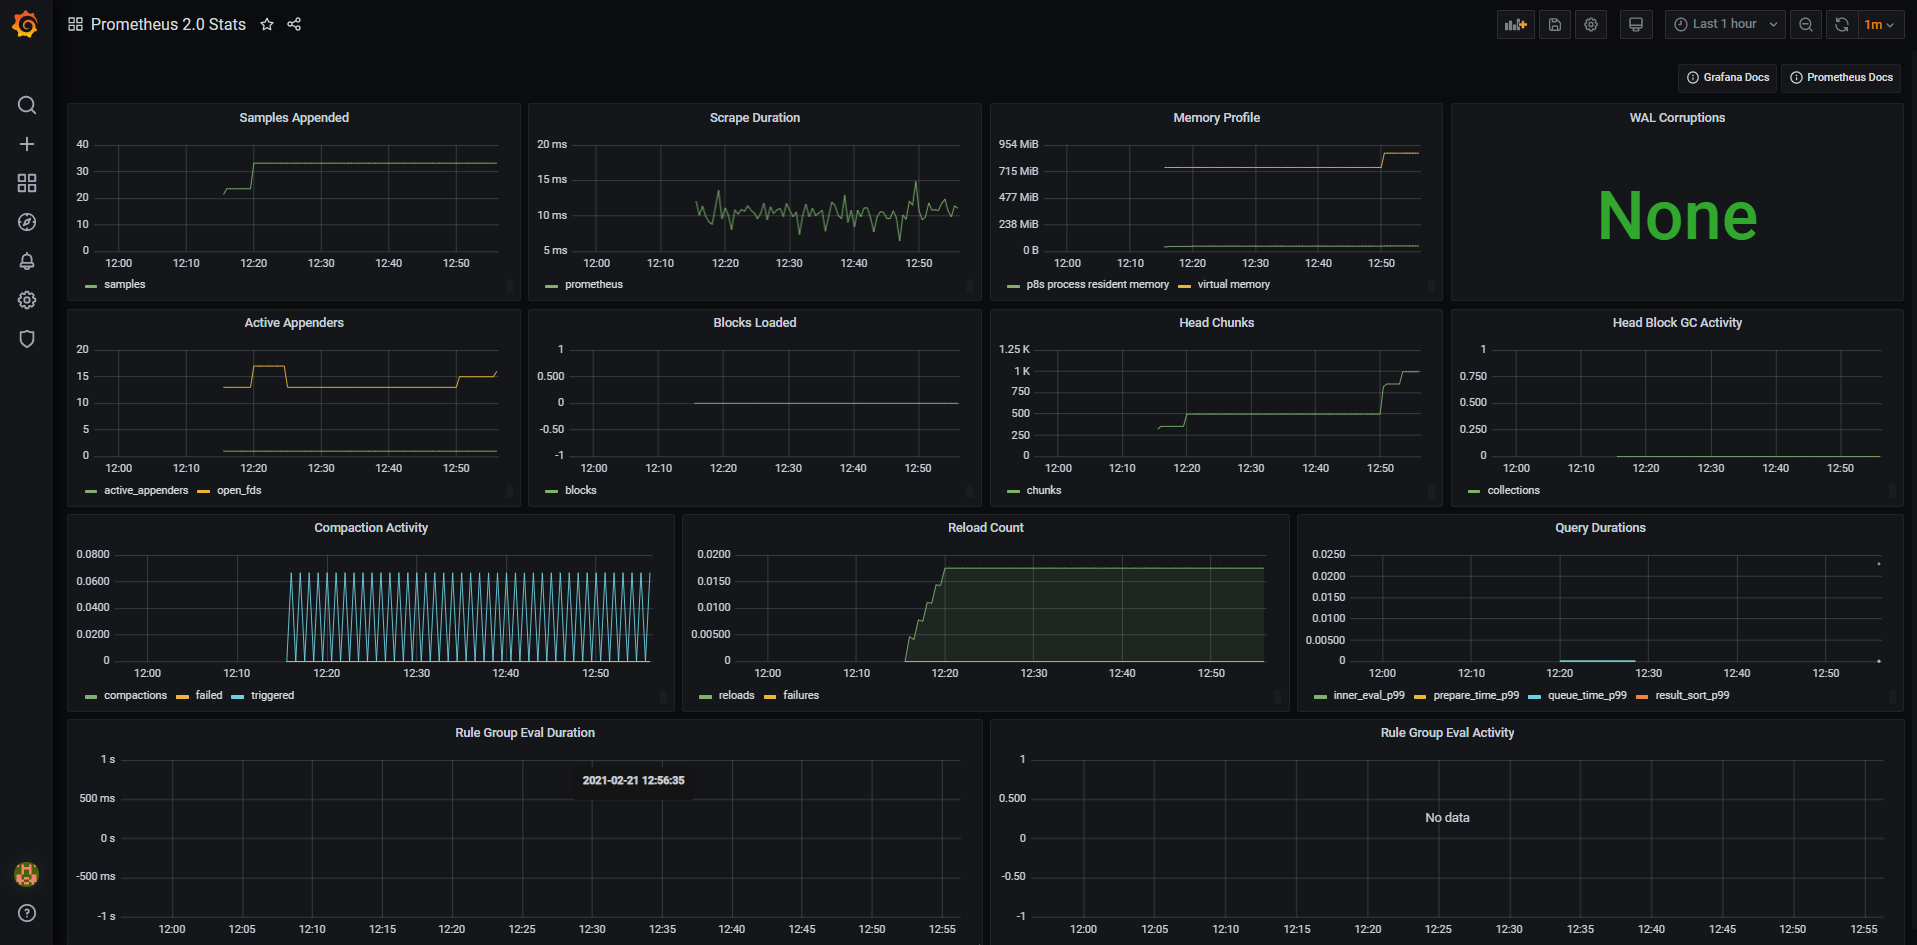
切换到我们刚才添加的“Prometheus 2.0 Stats”即可看到整个监控页面:
4 一些常用监控示例 4.1 监控Linux机器(node_exporter) 1 https://gi thub.com/prometheus/ node_exporter/releases/ download/v1.1.1/ node_exporter-1.1 .1 .linux-amd64.tar.gz
1 2 tar zxf node_exporter-1.1.1.linux-amd64.tar.gz -C /optmv /opt/node_exporter-1.1.1.linux-amd64 /opt/node_exporter
配置开机自启动:
1
2
3
4
5
6
7
8
9
10
11
12
13
14
15
16
vim /usr/lib/systemd/system/node_exporter.serviceenable node_exporter
启动服务:
1
2
systemctl start node_exporter
1 2 3 4 5 6 vim /opt/prometheus/prometheus.yml'linux-node' '192.168.0.112:9100' ]
重启Prometheus:
1 systemctl restart prometheus
Json文件下载地址:node-exporter_rev5.json
或者使用ID导入的方式:8919
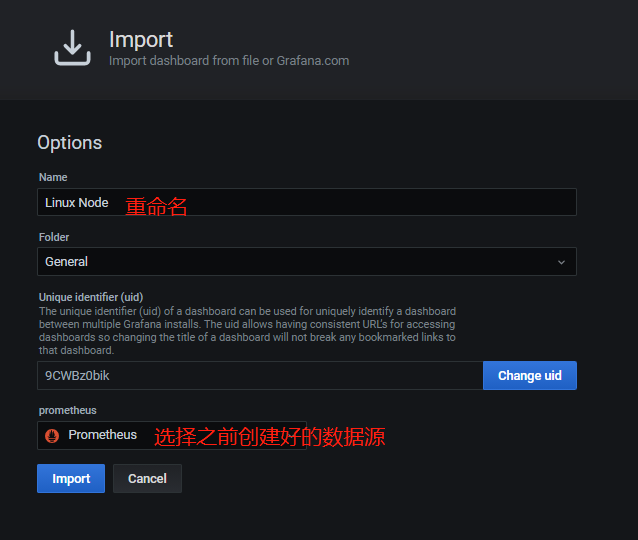
修改名字,选择我们前文创建好的数据源,点击导入即可:
下面这个提示是grafana缺少相关显示需要用到的插件piechart,grafana的默认插件目录是/var/lib/grafana/plugins,可以将下载好的插件解压到这个目录,重启grafana即可
插件下载地址:grafana-piechart-panel
1 2 unzip -q grafana-piechart-panel-5f249d5.zip -d /var/lib/grafana/plugins/
查看已安装插件:
1 2 3 /usr/sbin/grafana-cli plugins ls
Tips:安装插件还有另外一种命令行方式:
1 2 3 4 5 grafana-cli plugins install grafana-piechart-panel
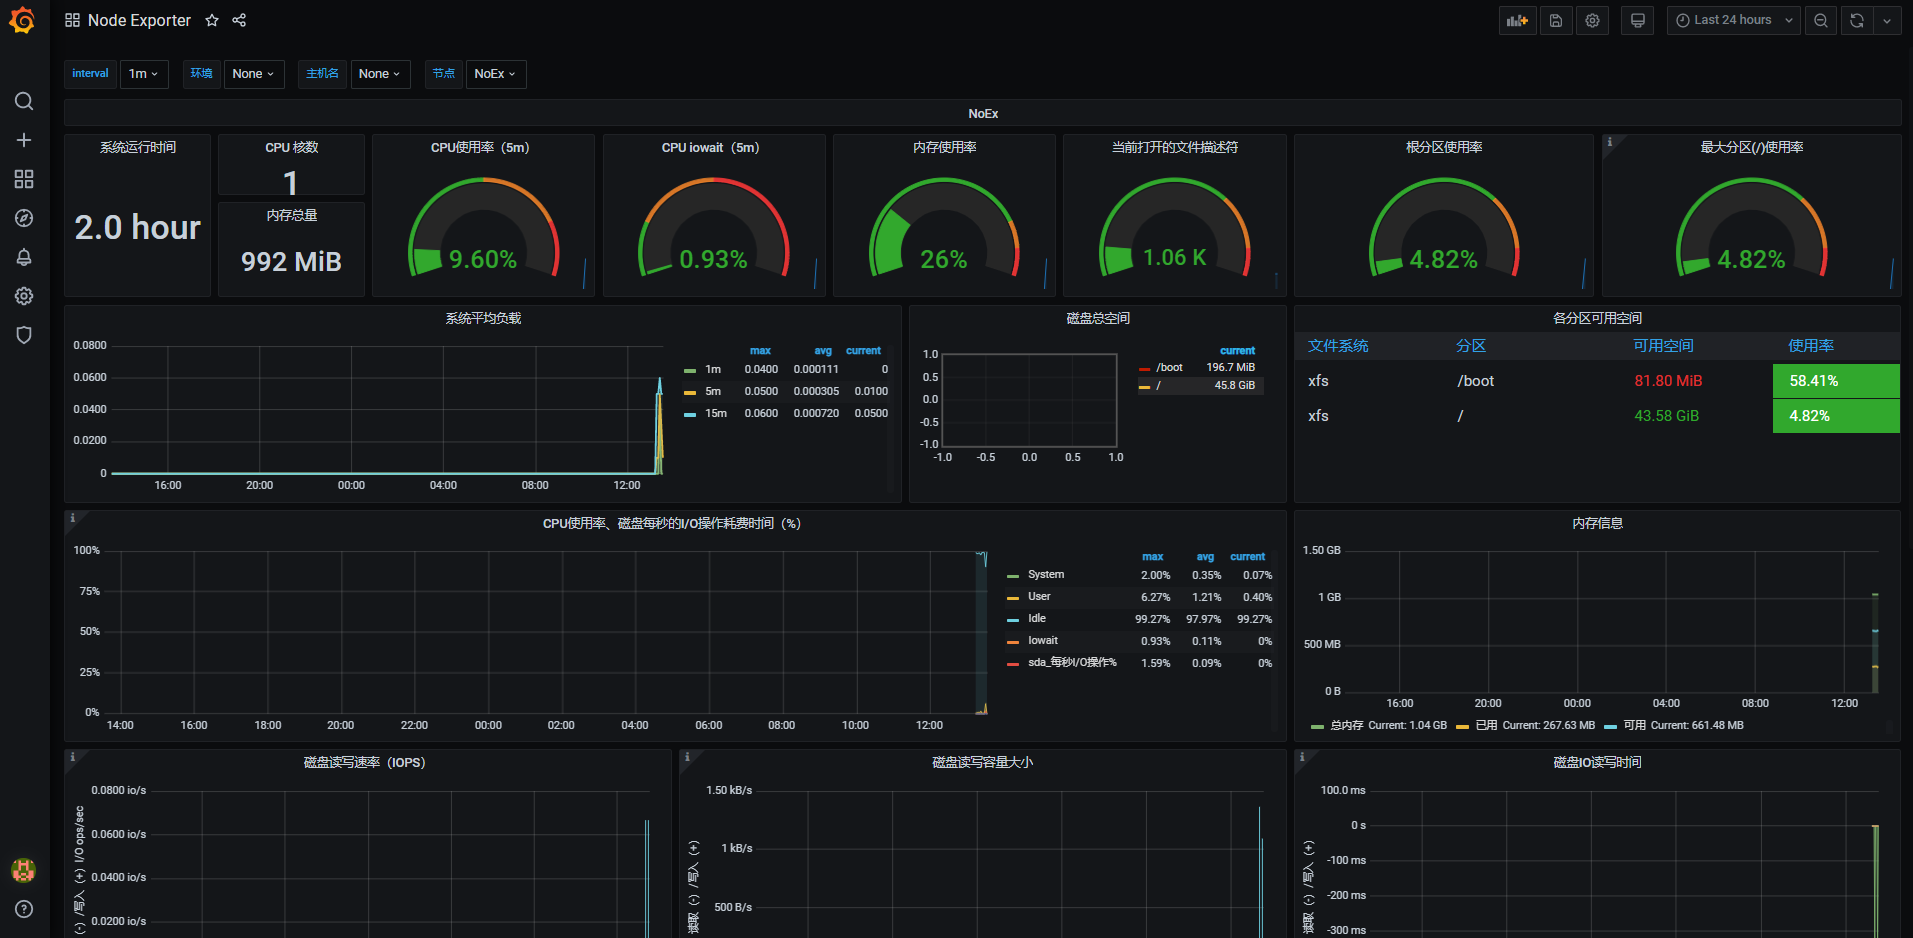
再刷新grafana页面,即可看到我们刚才设置好的node监控:
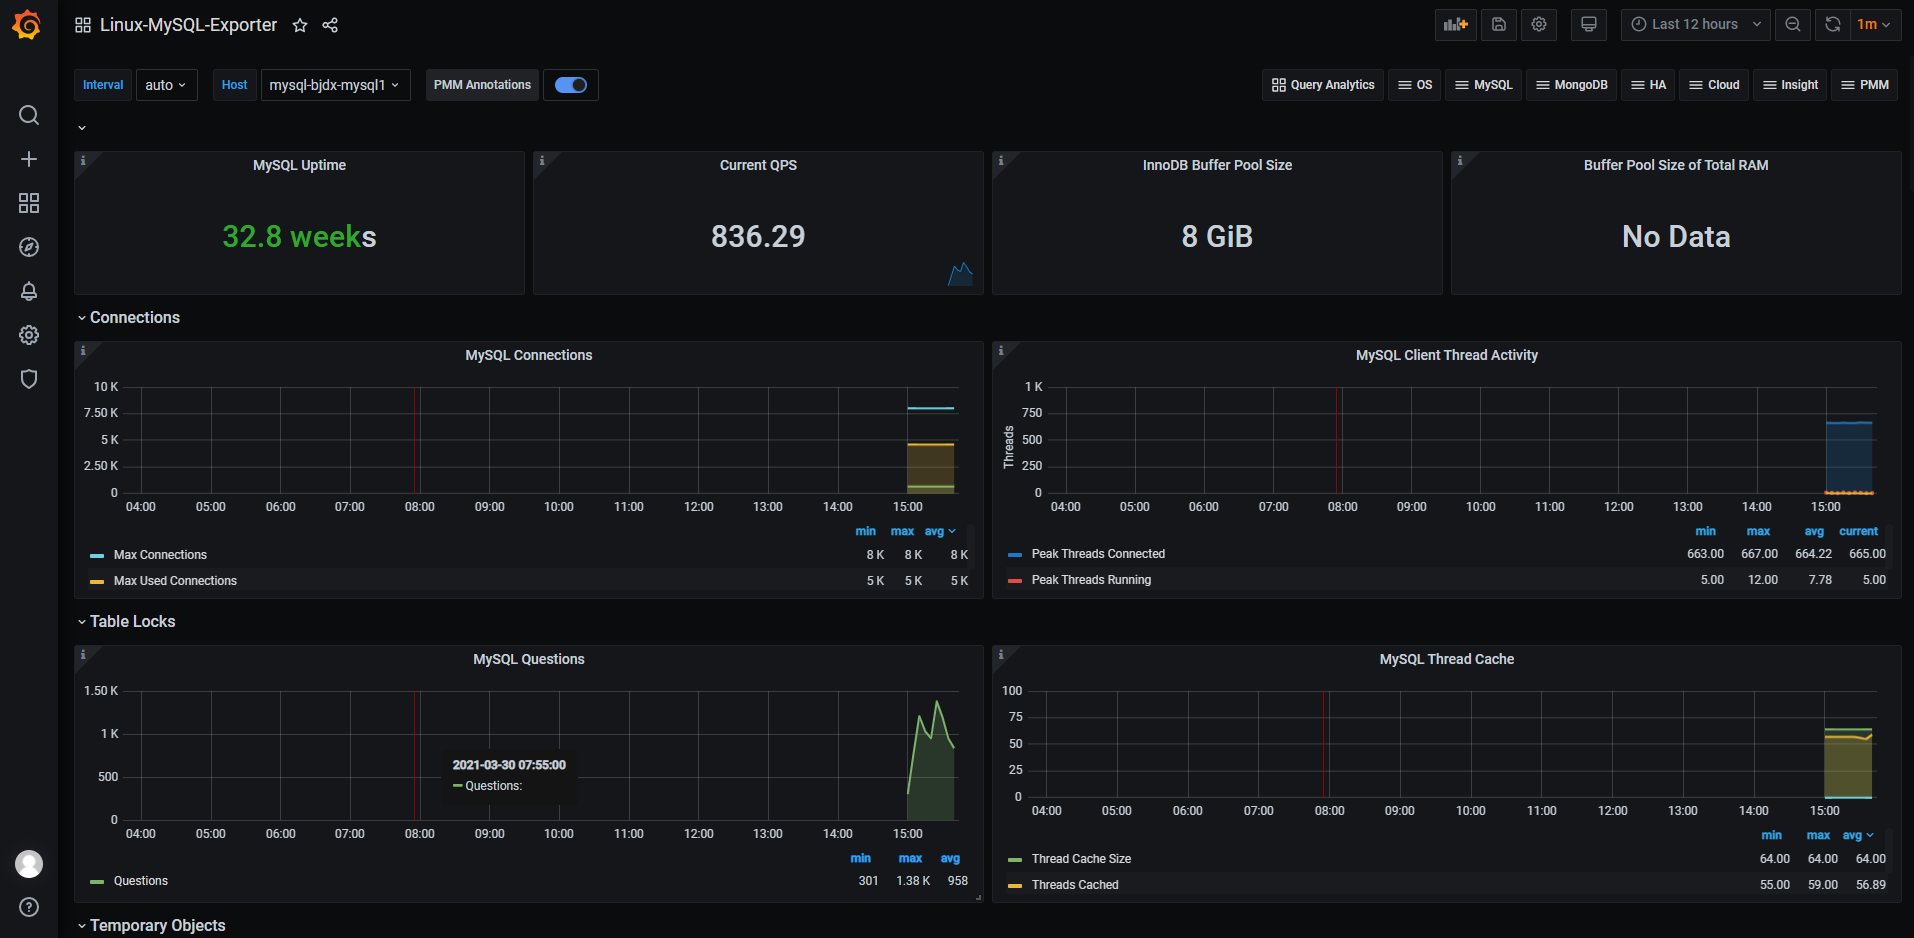
4.2 监控MySQL(mysqld_exporter) 1 2 3 GRANT REPLICATION CLIENT, PROCESS ON *.* TO 'mysqld_exporter' @'127.0.0.1' identified by 'mysqld_exporter' ;'mysqld_exporter' @'127.0.0.1' ;
1 https://gi thub.com/prometheus/my sqld_exporter/releases/ download/v0.12.1/my sqld_exporter-0.12 .1 .linux-amd64.tar.gz
1 2 3 4 mkdir -p /optmv /opt/mysqld_exporter-0.12.1.linux-amd64 /opt/mysqld_exportercd /opt/mysqld_exporter
设置配置文件,user为数据库登录用户,password为这个用户的密码: 1 2 3 4 5 6 7 vim .my.cnf
1 2 3 4 5 6 7 8 9 10 11 12 13 14 15 16 17 18 vim /usr/lib/systemd/system/mysqld_exporter.serviceenable mysqld_exporter
prometheus配置文件中加入mysql监控并重启: 1 2 3 4 5 6 vim /opt/monitor/prometheus/prometheus.yml'mysqld-node' '192.168.1.235:9104' ]
重启服务:
1 systemctl restart prometheus
模板Json文件下载地址:mysql_rev1.json
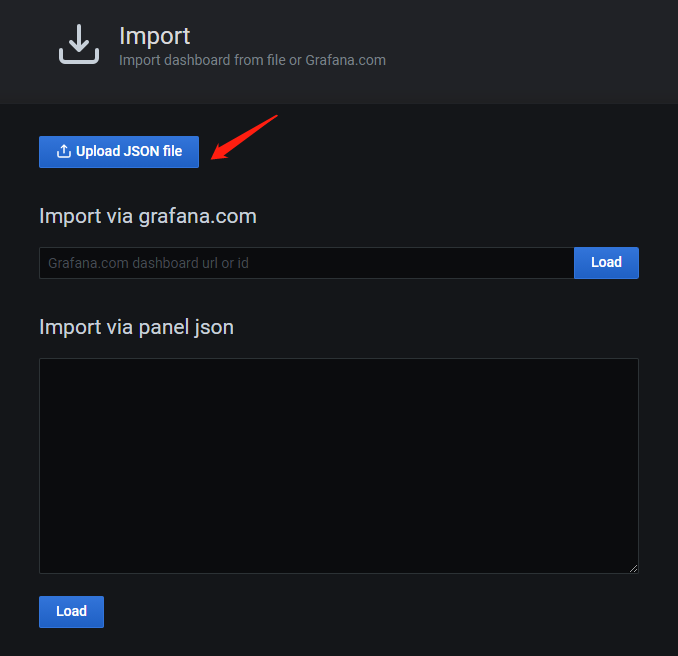
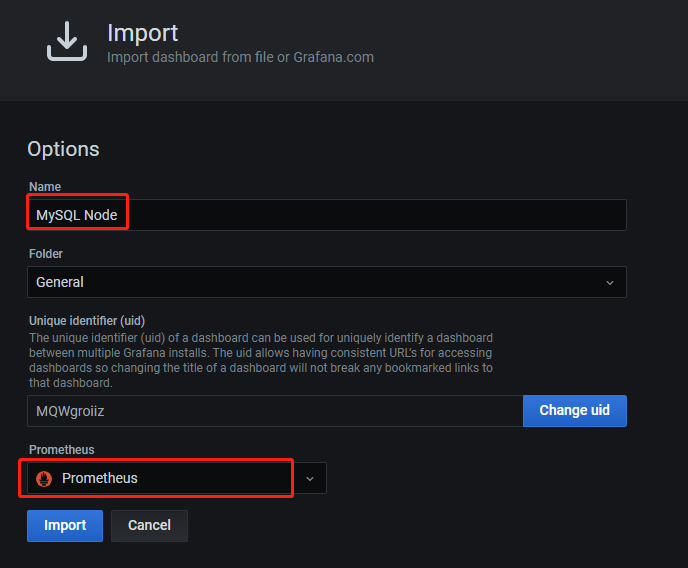
导入已经画好的dashboard,数据源选择刚刚创建好的 prometheus 数据源即可:
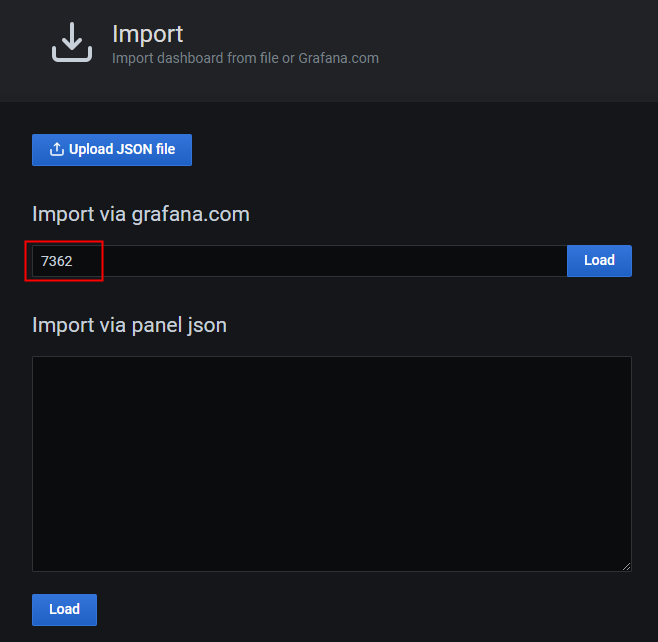
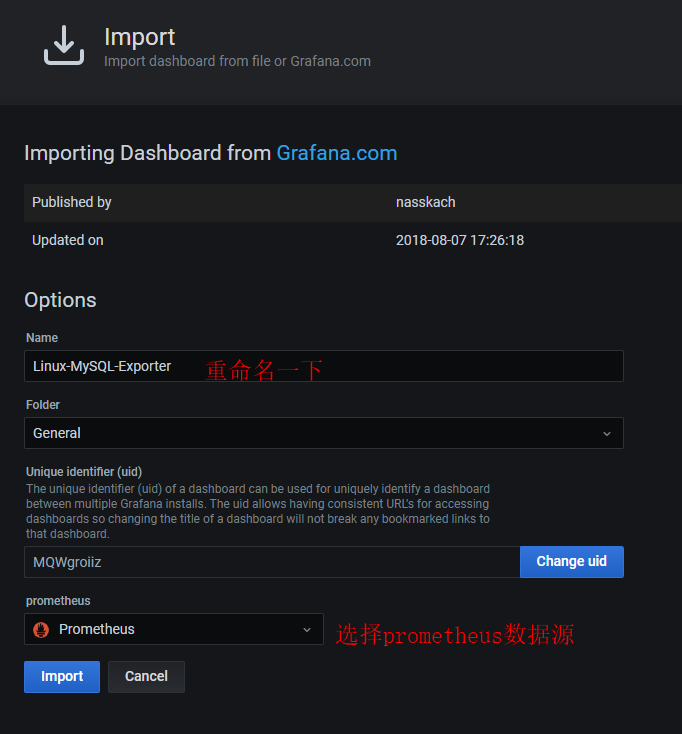
Tips: 导入模板那里也可以采用输入grafana id的方式进行import,这里我们不用上传该json文件,而是输入id 7362,然后点击 load 按钮即可:
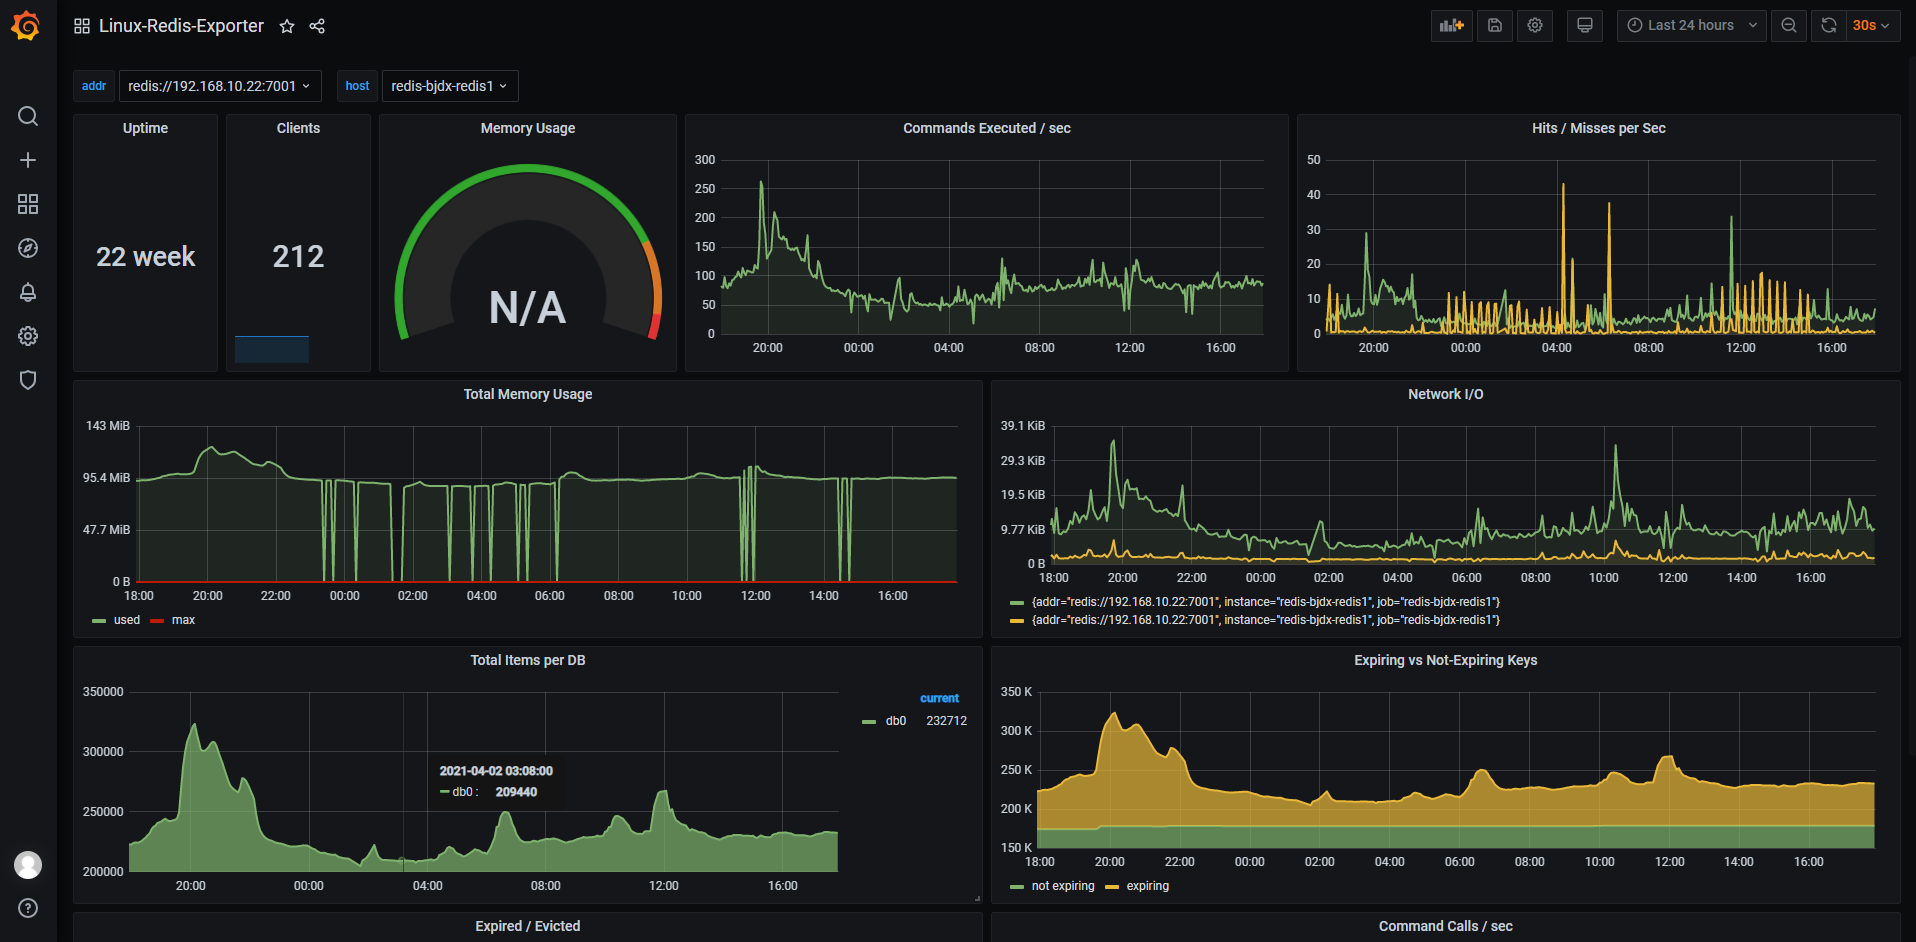
4.3 监控Redis(redis_exporter) 1 https://gi thub.com/oliver006/ redis_exporter/releases/ download/v1.20.0/ redis_exporter-v1.20.0 .linux-amd64.tar.gz
1 2 mkdir -p /opt/redis_exporter
1 2 3 4 5 6 7 8 9 10 11 12 13 14 15 16 17 18 vim /usr/lib/systemd/system/redis_exporter.serviceenable redis_exporter
prometheus配置文件中加入redis监控并重启: 1 2 3 4 5 6 vim /opt/prometheus/prometheus.yml'redis-node' '192.168.0.116:9121' ]
重启服务:
1 systemctl restart prometheus
Grafana ID: 4074 或者 14091
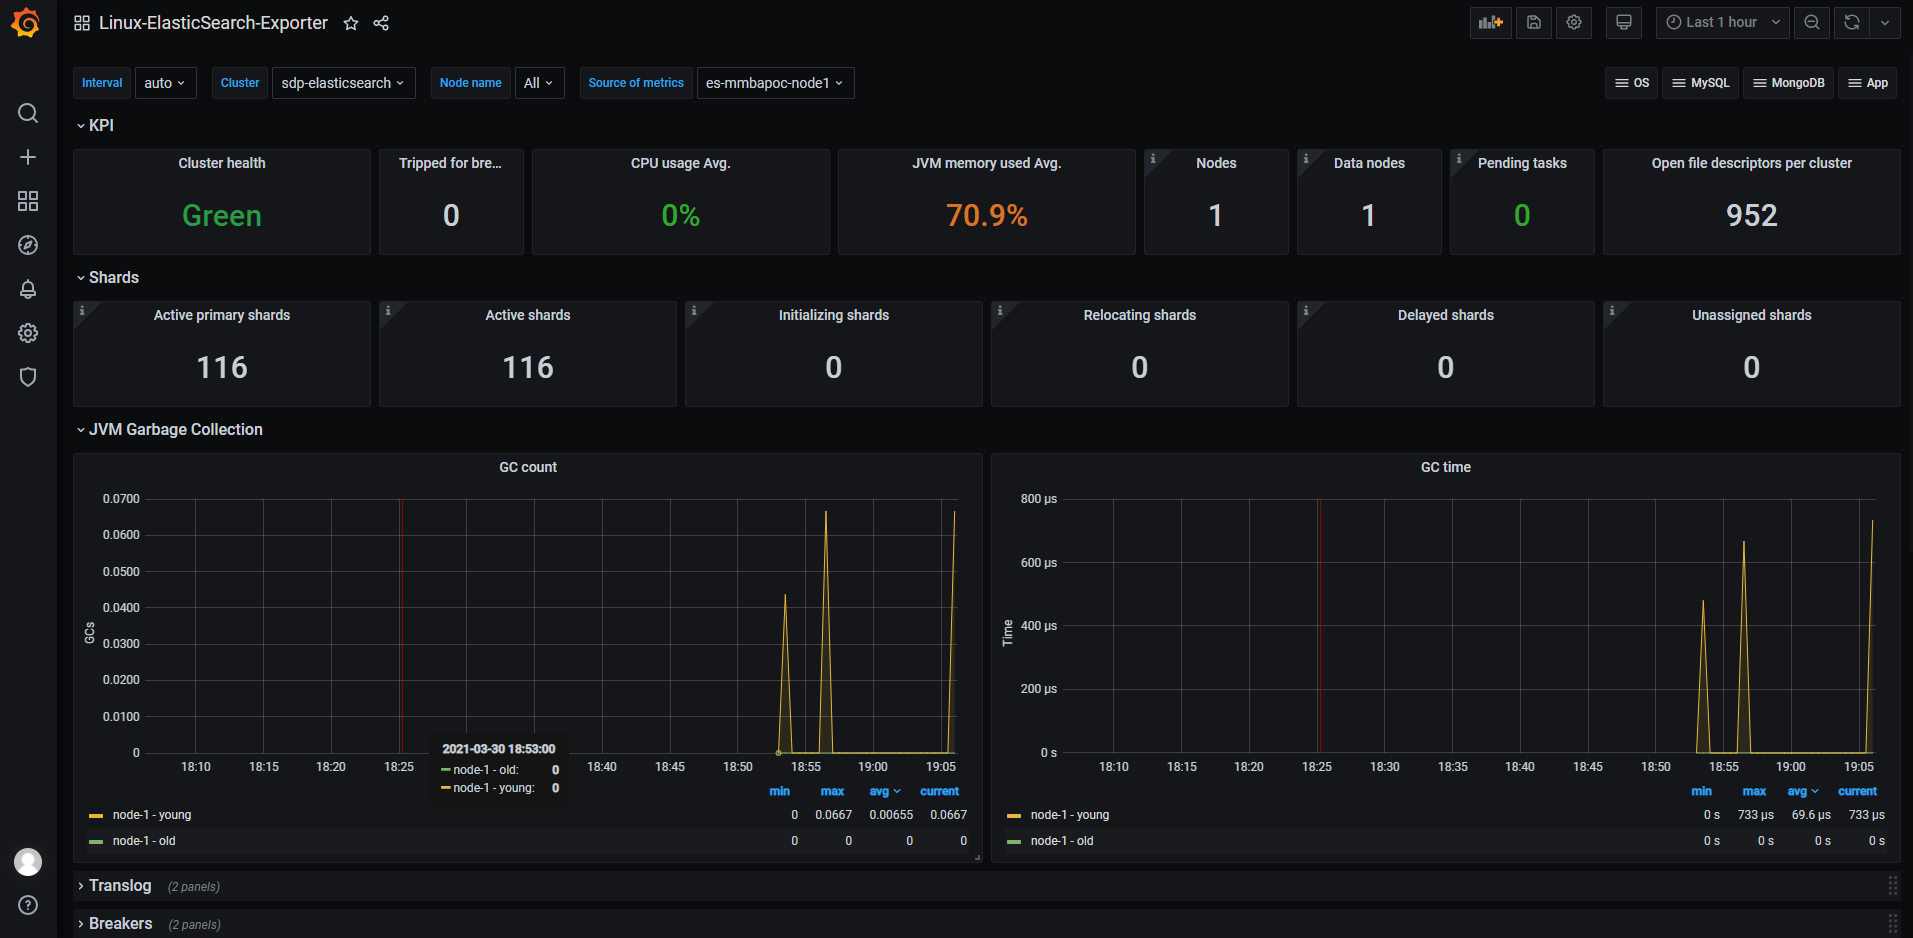
4.4 监控Elasticsearch(elasticsearch_exporter) 1 https://gi thub.com/justwatchcom/ elasticsearch_exporter/releases/ download/v1.1.0/ elasticsearch_exporter-1.1 .0 .linux-amd64.tar.gz
安装elasticsearch_exporter: 1 2 3 mkdir -p /optmv /opt/elasticsearch_exporter-1.1.0.linux-amd64 /opt/elasticsearch_exporter
1 2 3 4 5 6 7 8 9 10 11 12 13 14 15 16 17 18 19 vim /usr/lib/systemd/system/elasticsearch_exporter.serviceenable elasticsearch_exporter
prometheus配置文件中加入elasticsearch监控并重启: 1 2 3 4 5 6 vim /opt/prometheus/prometheus.yml'elasticsearch-node' '192.168.0.116:9114' ]
这里提供一段通过公网https协议进行监控的配置项: 1 2 3 4 5 6 7 - job_name: 'es-node' 'mmbapoc.zhizhangyi.com:9070' ]
解释一下:scheme指定pull数据的协议为https,metrics_path指定Exporter机器上Nginx反向代理匹配路径,见下文。
1 2 3 4 5 6 7 location /es/node1 {$http_host ;$remote_addr ;$proxy_add_x_forwarded_for ;$scheme ;
解释一下,该Nginx部署在内网中,Prometheus通过公网请求Nginx,然后由Nginx反向代理到Exporter服务器。
1 systemctl restart prometheus
Grafana ID: 2322
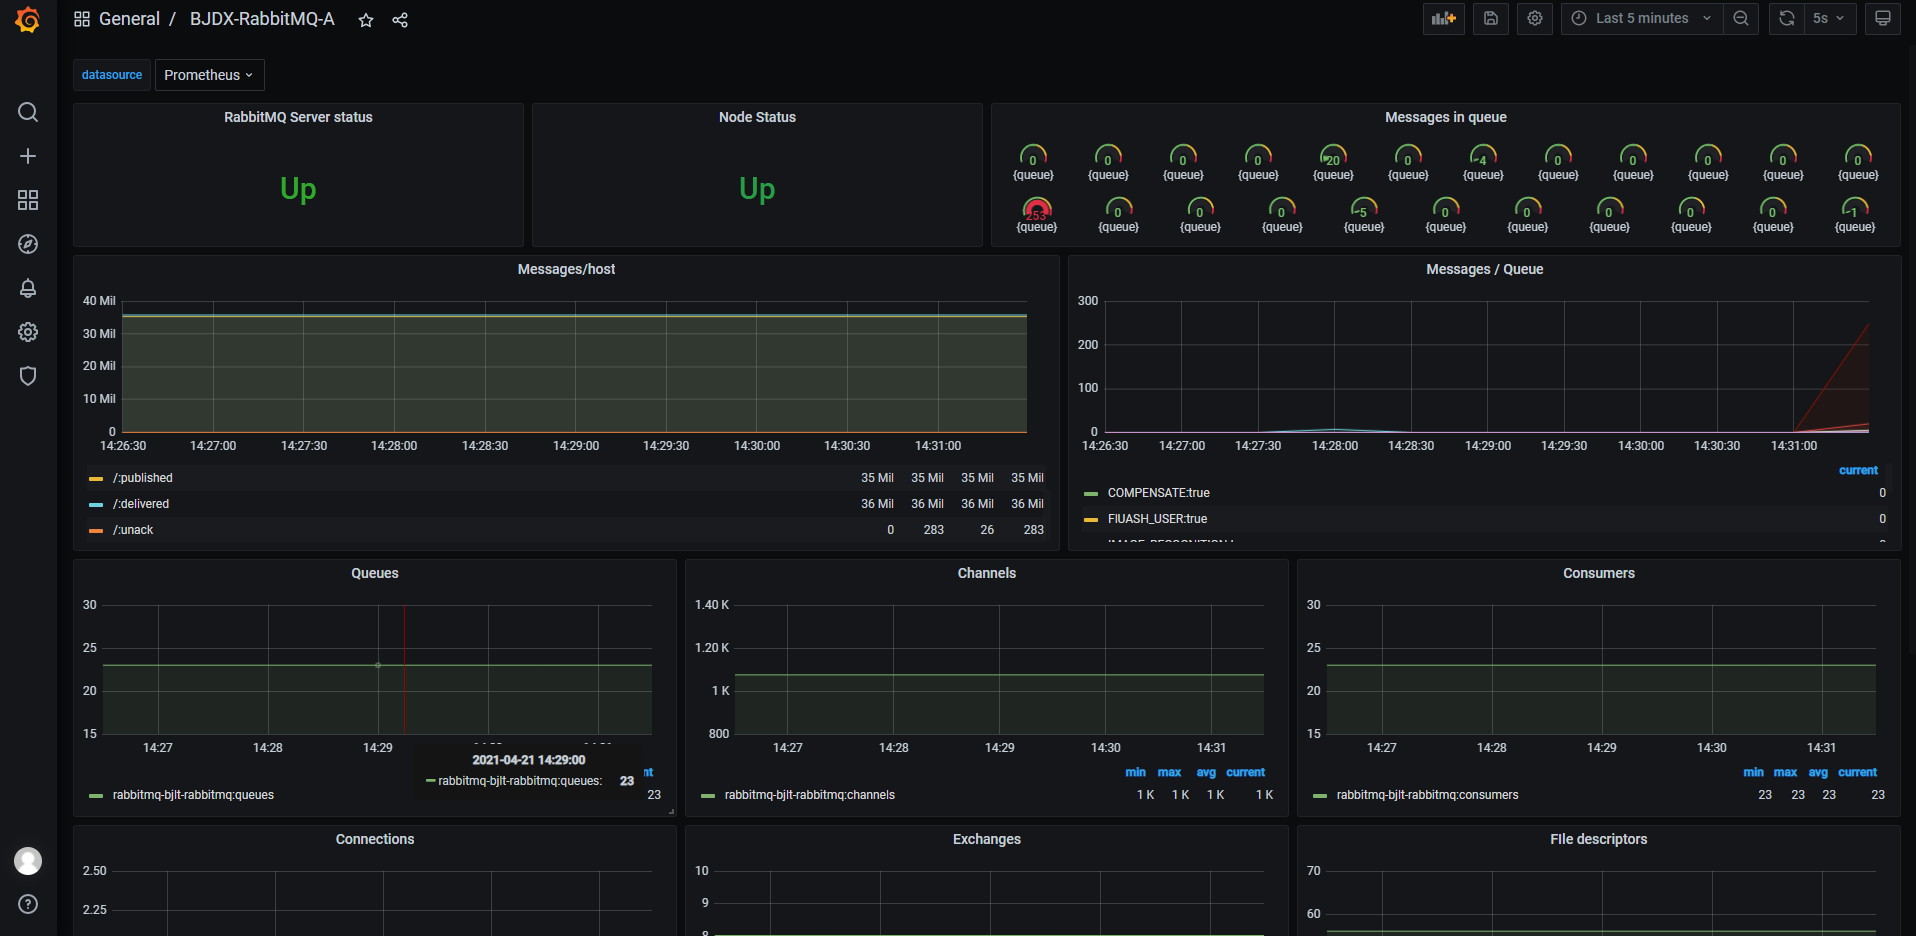
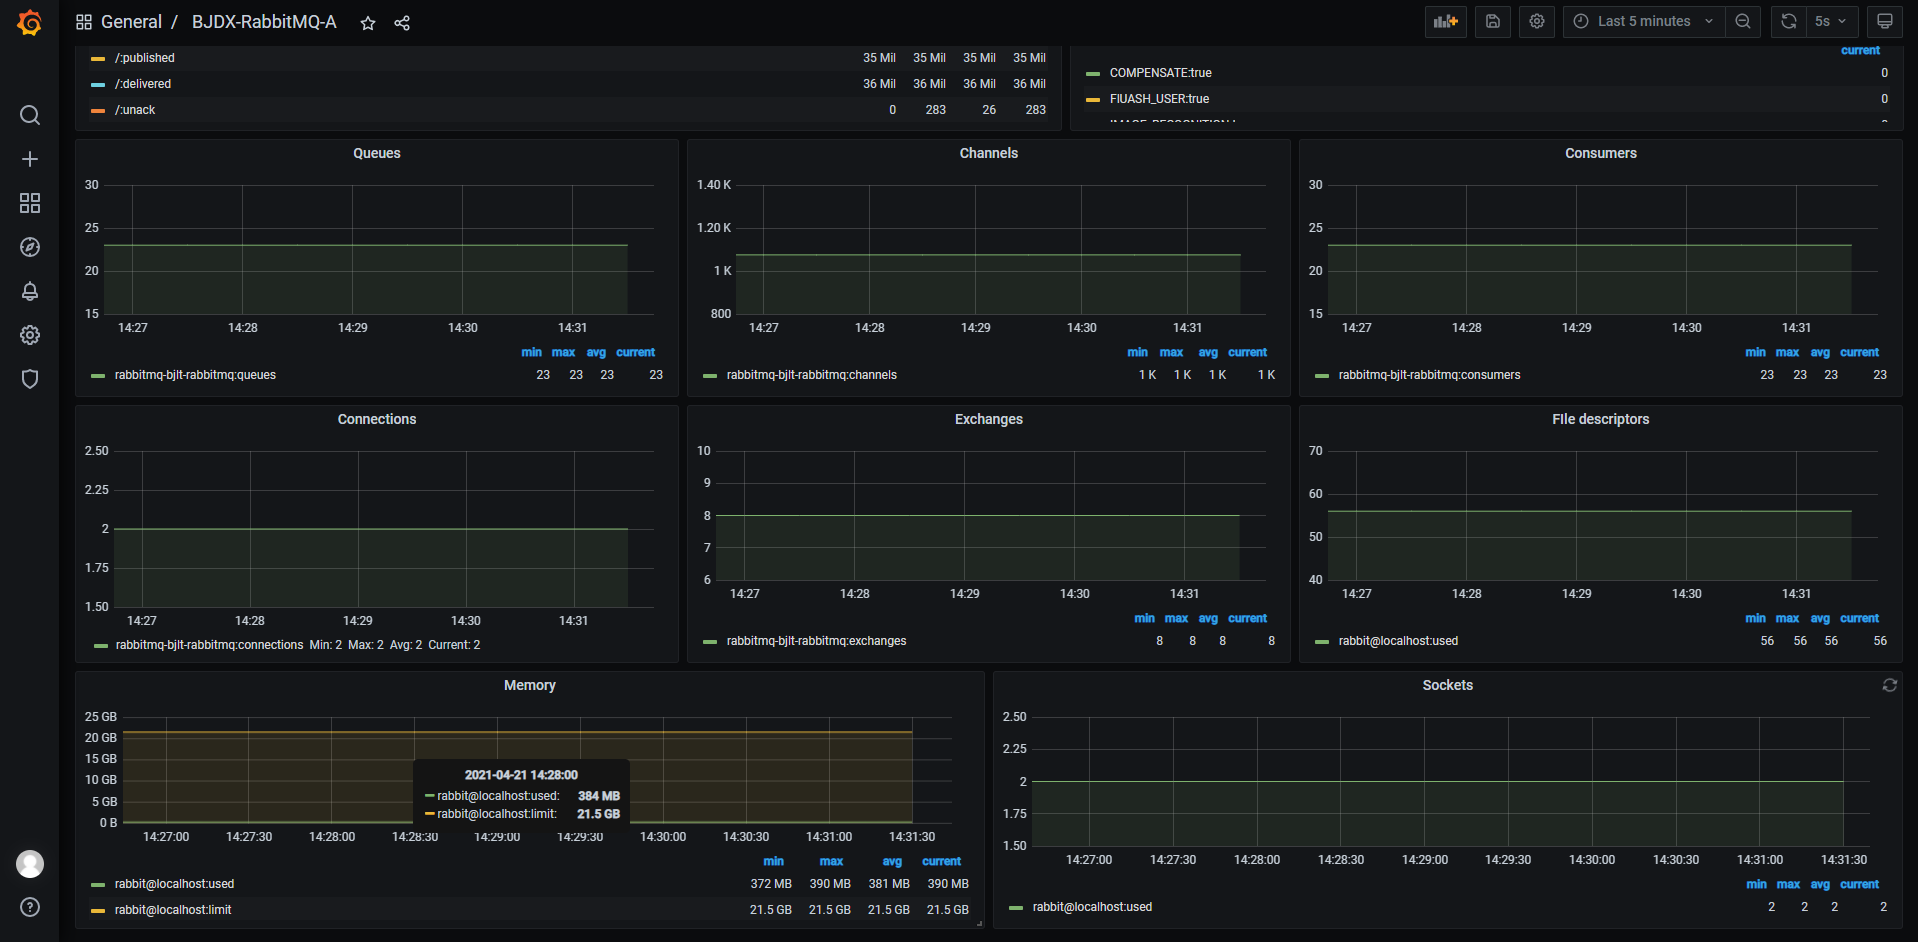
4.5 监控Rabbitmq(rabbitmq_exporter) 1 https://gi thub.com/kbudde/ rabbitmq_exporter/releases/ download/v1.0.0-RC8/ rabbitmq_exporter-1.0 .0 -RC8.linux-amd64.tar.gz
1 2 3 mkdir -p /optmv /opt/rabbitmq_exporter-1.0.0-RC8.linux-amd64 /opt/rabbitmq_exporter
1 2 3 4 5 6 7 8 9 10 11 12 13 14 15 16 17 18 19 20 21 22 23 24 25 26 27 28 29 30 31 32 33 34 35 36 37 38 39 40 41 42 43 44 45 46 47 vim /usr/lib/systemd/system/rabbitmq_exporter.service"rabbit_url" : "http://127.0.0.1:15672" ,"rabbit_user" : "rabbitadmin" ,"rabbit_pass" : "123456" ,"publish_port" : "9119" ,"publish_addr" : "" ,"output_format" : "TTY" ,"ca_file" : "ca.pem" ,"cert_file" : "client-cert.pem" ,"key_file" : "client-key.pem" ,"insecure_skip_verify" : false ,"exlude_metrics" : [],"include_queues" : ".*" ,"skip_queues" : "^$" ,"skip_vhost" : "^$" ,"include_vhost" : ".*" ,"rabbit_capabilities" : "no_sort,bert" ,"enabled_exporters" : ["exchange" ,"node" ,"overview" ,"queue" "timeout" : 30,"max_queues" : 0enable rabbitmq_exporter
prometheus配置文件中加入rabbitmq监控并重启: 1 2 3 4 5 6 vim /opt/prometheus/prometheus.yml'rabbitmq-node' '192.168.0.116:9119' ]
这里提供一段通过公网https协议进行监控的配置项: 1 2 3 4 5 6 7 - job_name: 'rabbitmq-node' 'mmbapoc.zhizhangyi.com:9070' ]
解释一下:scheme指定pull数据的协议为https,metrics_path指定Exporter机器上Nginx反向代理匹配路径,见下文。
1 2 3 4 5 6 7 location /rabbitmq/node1 {$http_host ;$remote_addr ;$proxy_add_x_forwarded_for ;$scheme ;
解释一下,该Nginx部署在内网中,Prometheus通过公网请求Nginx,然后由Nginx反向代理到Exporter服务器。
1 systemctl restart prometheus
Grafana ID: 10120
4.6 监控JMX(jmx_exporter) 以下配置与业务联系紧密,不具有广泛参考性!
源码地址 | 编译后下载地址
将上述jar文件上传至项目目录下,我们以 mmba-service 为例,将jar包存放在 mmba-service/classes/jmx_prometheus_javaagent-0.15.0.jar。
修改 mmba-service 服务的启动参数:
1 2 nohup java -Dconfig.cluster=${ZOOKEEPER_URL} -Xmx1G -Xms1G -classpath \
1 2 3 4 5 6 7 nohup java -javaagent:./jmx_prometheus_javaagent-0.15.0.jar=9501:./config_jmx.yml \false \false \${ZOOKEEPER_URL} \
主要区别是:
1 2 3 4 -javaagent:./jmx_prometheus_javaagent-0.15.0.jar=9501:./config_jmx.yml \false \false \
config_jmx.yml 配置文件内容:
1 2 3 4 5 6 ---false false false
注意端口要一致,启动服务Java服务。
配置Nginx代理:
1 2 3 4 5 6 7 location /java/mmba/service {$http_host ;$remote_addr ;$proxy_add_x_forwarded_for ;$scheme ;
这个路径是自定义的路径,要与下文中 prometheus 的配置文件中 metrics_path 值匹配。
重载Nginx:
1 /opt/nginx/sbin/nginx -s reload
修改 prometheus 配置文件:
1 2 3 4 5 6 7 8 sudo vim prometheus.yml'mmba-service' 'mmba116.test.com:9070' ]
重启 prometheus 服务:
1 sudo systemctl restart prometheus
登录grafana面板配置 dashboard:
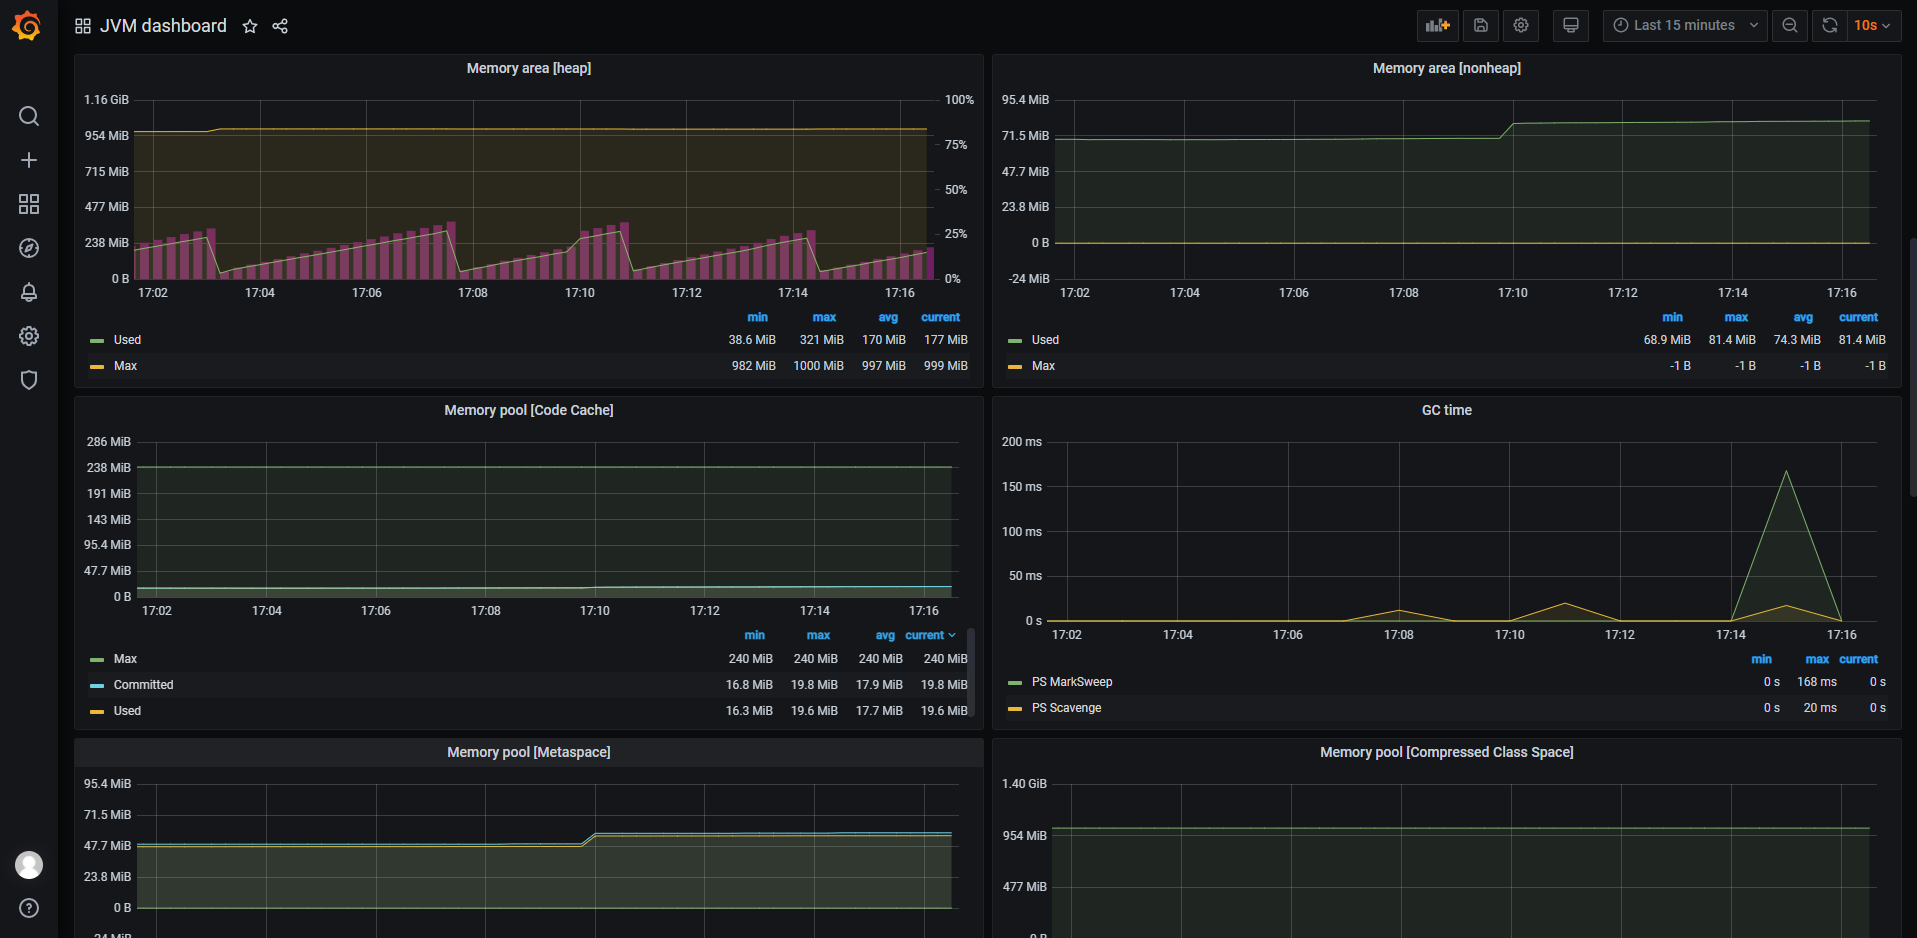
导入模板那里输入 grafana id 为 10519 。
示例截图:
5 常用网站 prometheus download: https://prometheus.io/download/ prometheus exporter: https://prometheus.io/docs/instrumenting/exporters/ grafana dashboard: https://grafana.com/dashboards grafana plugins: https://grafana.com/plugins 


